In this article, I’d like to show how to instantiate a UIViewController from a Storyboard using a protocol-oriented approach.
Usually to create view controllers from UIStoryboard, we use the instantiateViewController(withIdentifier:) method of the UIStoryboard class to create an instance of the desired view controller. For example:
let storyboard = UIStoryboard(name: "Main", bundle: nil)
let viewController = storyboard.instantiateViewController(withIdentifier: "MyViewController")
This approach works, but it can be tedious if you have a large number of view controllers in your project, and reusing the code across multiple view controllers can be challenging.
To address these issues, we can use a protocol-oriented approach to instantiate view controllers from a UIStoryboard.
To make it easier to explain, I created a small project (download) with three Storyboards.
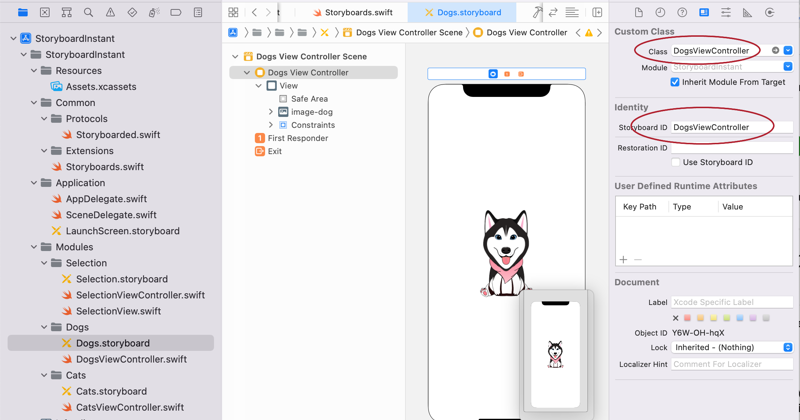
They are called: Selection.storyboard, Dogs.storyboard, Cats.storyboard. In order to make everything work as it should, you need to fill in the Storyboard ID field with the name of the controller class. For example, as in the picture above.
enum Storyboard: String { case Selection case Dogs case Cats var instance : UIStoryboard { return UIStoryboard(name: self.rawValue, bundle: Bundle.main) } }
We then add a function that instantiates a UIViewController.
enum Storyboard: String {
    case Selection
    case Dogs
    case Cats

    func viewController<T: UIViewController>() -> T {
  let identifier = String(describing: T.self)
  guard let viewController = self.instance.instantiateViewController(withIdentifier: identifier) as? T else {
    fatalError("Failed to instantiate view controller with identifier \(identifier)")
  }
  return viewController
}
Next, we define a protocol that all of our view controllers will conform to:
protocol Storyboarded {
    static func containingStoryboard() -> Storyboard
}

extension Storyboarded where Self: UIViewController {
    static func instantiate() -> Self {
        let controller: Self = containingStoryboard().viewController()
        return controller
    }
}
We then extend the DogsViewController class to conform to the Storyboarded protocol.
class DogsViewController: UIViewController {
    override func viewDidLoad() {
        super.viewDidLoad()
    }
}

extension DogsViewController: Storyboarded{
    static func containingStoryboard() -> Storyboard {
        return .Dogs
    }
}
Now, any view controller that conforms to the Storyboarded protocol can be instantiated from a UIStoryboard by calling its instantiate() method.
@IBAction func selectDog(_ sender: Any) {
    self.navigationController?.pushViewController(DogsViewController.instantiate(), animated: true)
}
That’s it. Everything is ready.
By using a protocol-oriented approach, we’ve simplified the process of instantiating view controllers from a UIStoryboard and made it easy to reuse this code across multiple view controllers in our project.
Please let me know if you using this approach. You can find more information on my Medium account